ALCOHOL MARKER INSTRUCTOR AND SPECIALIST. As former Certification Instructor for both Copic and Spectrum Noir, I have a wide variety of knowledge to assist all types of alcohol Markers... Now also teaching watercolor stamping and assorted card classes.
Oh My! I can finally share some fun news! Splitcoast Stampers asked me to do a coloring tutorial for their website! I was so excited! I thought I would not be able to keep a secret until time to post, but I kept my lips sealed! I decided I to do a little tutorial on coloring transparent balloons. I have done this technique in many of my classes, and everyone always seem to enjoy it.
Jumbo Balloons by The Peddler's Pack
For the tutorial, I used the much smaller stamp, to keep the video short. You would use the same exact technique to color the larger image. Here are a few photos of transparent balloons. Please check out the tutorial on the Splitcoast Stampers website .
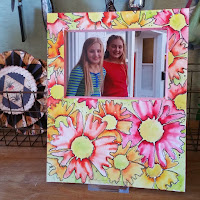
Well, Here I am with my two entries for the Butterflies and Blooms challenge. I don't know why but I seem to always say flutters and butters when trying to say flowers and butterflies. lol... I am not really a mixed media gal, but am trying to break out of my comfy zone, because I find that the cards I make go into a shoe box and stay there. Things like this, I can set out and share with others or give as gifts.
When I saw Ken's challenge project I was totally inspired and remembered some old frames I had in the garage in the "someday projects box". Here is Ken's Project.
I started out by trimming a piece of Canson watercolor paper to fit the frames. In the first photo I used the Hibiscus stamp drawn by Dina Kowal, it's available through Impression Obsession. I just love this stamp, it looks like it was drawn with a thin black marker. For the second and third projects, I then used
Stampendous Duo stencils and pen to trace my flowers onto the watercolor paper. These Duos are so cool because they come with two stencils that you can layer or use separately and also have a awesome pen. You can find them in your local scrapbook store!
Stampendous Duos
Trim watercolor cardstock to fit frame
Trace flowers onto your cardstock using the stencils and pen provided in Duos set.
You can also add doodles as desired.
Make a paint palette using colorburst or ink refills and water.
Now using a paint brush paint your image as desired. I wanted a bright strong finished project to look tropical. So I used strong mixtures and layed the "paint" on thick. If you want a more pastel looking finished project, you can use more water and less colorburst or ink. To add the textured background, I first painted using Turquoise Colorburst, then I dropped water onto the background and dabbed it up with a dry papertowel. It diluted areas to make a textured watery background. Here are the finished projects.
Be sure to check out the Mixed Media challenge and see all of the projects by team members and entries. I was super impressed with a few DT members entries... Here are my favs.
I had so much fun playing to make this card. I put the instructions below. I hope you enjoy it.
Tombow marker flowers
Scrapbook Adheasives
1. Stamped image and colored them using Copics on one card and Tombow markers on the other. You pick how you want to color yours (you can even use your colorburst as watercolor, but i didn't have any the right colors).
2. On quality watercolor paper, I sprinkled just a bit three colors of Colorburst. Spritzed with water and swished around with a paint brush. LET DRY or use heat gun to speed it up.
3. Dropped a few drops of water onto the dry background and let set for a few mintues before lifting with papertowel.
4. Stamp greeting using versamark and white embossing powder. Heat with heat gun.
5. Sprinkle a bit of Stampendous Chunky white embossing powder onto the card randomly and heat from below.
6. Assemble card using Scrapbook adhesives mounting squares.
7. Glue onto cardstock and card is ready to add a greeting inside and mail to a friend.
All Stamps available through Stampendous.
You are Amazing CRH324
Wonderful Friend
Backgound stamps
NKCR501
Daisy crs5082
Stampendous white embossing powder EP100
Stampendous Chunky white embossing powder FREG021
Canson Watercolor Paper
Colorburst tropical colors
Paint brush
Spritz bottle with water.
Copics or Tombow markesrs to color flowers.
WOW! Have you seen the new ocean stamps by Stampendous! I am over the top thrilled with them. Not to mention the embossing powder technique that I am addicted to for the background. Fran showed it to me at CHA and I have just been itching to try it a million times (and have done it a million times). It's is so fun! Check out the short video here on how to get this coolest look! These two sets each come with matching die cuts so you won't have to fussy cut if you don't want to! Toot Toot!
Ok... so here are the step outs. First I used a hot plate that I had hanging around taking up room in my kitchen cabinet. You might find a pancake griddle at Goodwill or thrift store that will work great! For easy clean up cut a small piece of your craft mat to lay on top. My little circle one does not have room for a mat.
First lay your chipboard on hotplate and sprinkle with embossing powders.
Second add a bit of clear embossing powder over your sand to use as glue to hold on the Fragments I used for my sandy ocean floor. Use any color you wish, I prefer the rose or taupe. If the Fragments don't stick, sprinkle on a bit more clear embossing powder.
Here is a quick video to show the steps. It is so fun, you will be glad you tried it! Have fun and please share your project with me!
CRS5090_DCS5090_SSC1246_JLB
Embossing Powders: EK22 Beach, Chunky Clear FREG004
Glitter:
Tools: Big Shot, Hot Plate, Scissors, Paper cutter,
I am thrilled to announce this class. It will be on June 25 at The Stamp Addict in San Diego. All guests must bring their own alcohol ink pens (Copic, Spectrum Noir or Twin Touch), adhesive, foam adhesive, scissors. Please call store for details, price and times.
Sail Boat:
Hull E49, E37, E35
Water: done with ink refills (supplied by teacher)
Sails: E41, E43 (or E81)
Flower:
any red. R29
any teal blue ie: B04
Green: yg03, YG63
Yellow: y38, Y17, Y15, Y11
Hope to see you there! Please note that this class is expected to sell out very quickly. Please make sure to rsvp early. We always have last minute signups and we have limited seats. Only 15 kits will be made for this class.
Whoot Whoot - here are the samples for our june class. I am so excited. If you know me you know how much I love scuba diving with the turtles... check out this awesome ocean friends set. You can even get the matching dies that cut perfect! The set has a dolphin, turtle, seahorse large clam shell and a mermaid. Perfect for summer!
The second card is just as fun using the new shells stamp and die sets... I love them! so fun. Backgrounds are done with Ranger ink refills and ink sprays.. you will have to come to class to see how to make that fun messy water looking background.
And there is always sunshine and flowers for summer, so this last card is so fitting. I hope you will join me on June 24th at The Stamp Addict or at my house on May 14th. It will be so fun. Call Store for details at 619-667-5060 or check out the samples at their store!
Here is a fun image that I colored for the January 2016 Stampendous Catalog.
This one gives a lot of practice on "flicking" If you have taken any of my classes, you all know that I refer to an airplane doing a touchdown. When a plane barely lands then lifts back up. That's the motion you want to do when flicking your Copic brush. Do not sit your brush down onto the paper before flicking. You want to gradually touch the paper while flicking or twisting your wrist, and continue your flick as you gradually lift off the paper. This is kinda hard to explain unless you see it in motion. Therefore, I just pulled out my camera and did a quick little video below.
I really wanted some fresh air so I pulled my camera out onto the patio and recorded out there.. (sorry about the background noise - seems all the dogs, planes and neighbors decided it was nice to be out also!).
The colors used here are:
Purples:V01, V12, V15, V09 or RV02, V12, V15, V09
Greens: YG03, YG63, YG67
Mouse: W1, W3, W5, E00, E11, E000 and R20 for a bit of cheeks.
Stamp available through Stampendous or your local Stamp store: Thistle Nap #HMR57
Give it a try, if you have a question, please ask. Looking forward to seeing your comments on what you thought of this card.